As a PhD student doing qualitative research I spend an awful lot of my life transcribing. Details of my transcription strategy are probably best suited to another blog post, but the general gist is this: I record interviews with an Olympus LS3 or Skype recordings with Audacity (using this guide), and then transcribe my recordings with the Mac software “F4”, before coding in the lovely new Mac version of Atlas.ti. For the past 3 years I’ve then been using a cheap USB footswitch for playing and pausing recordings with F4, which saves an awful lot of time compared to other methods I tried.
I’ve recently found myself wanting a more comfortable footswitch (the one I linked to is great, but after a while I get a rather achy foot because it has quite a lot of “throw” and the pivot isn’t in the most comfortable place either) with a bit more functionality (at least two switches, so I can skip forwards through the less exciting parts of the interview).
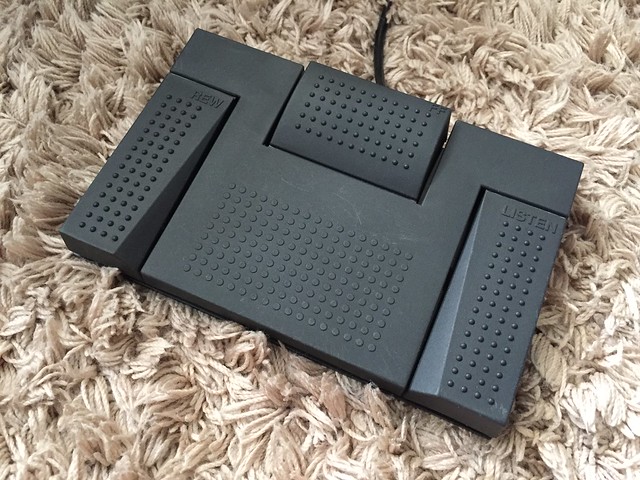
I recently bought a few attiny85 based digisparks from eBay (for another project) and thought they offered a perfect opportunity to update an old analog transcription pedal (the model I got was an Olympus RS26 which sells very cheaply on eBay) to make them compatible with modern-day non-propriety transcription software. It’s worked perfectly, so I thought I’d share a post so you can also get upcyling and have a lovely USB transcription foot pedal for less than £15.
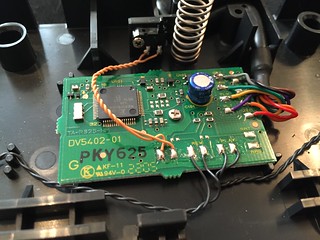
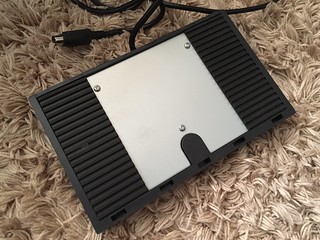
First up, you need to open up your foot pedal and see what’s inside. I wasn’t too sure what to expect, but I was hoping for a few simple switches so that I could easily desolder and wire up to the arduino. Luckily I wasn’t disappointed.
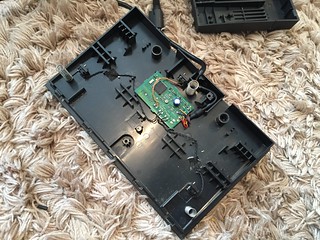
Next up was connecting the switches. Before doing this I had to remove the SMD LED connected to pin 1 on my digispark clone – the LED interferes with the (rather weak) pullup resistor and prevents the switch from working correctly.
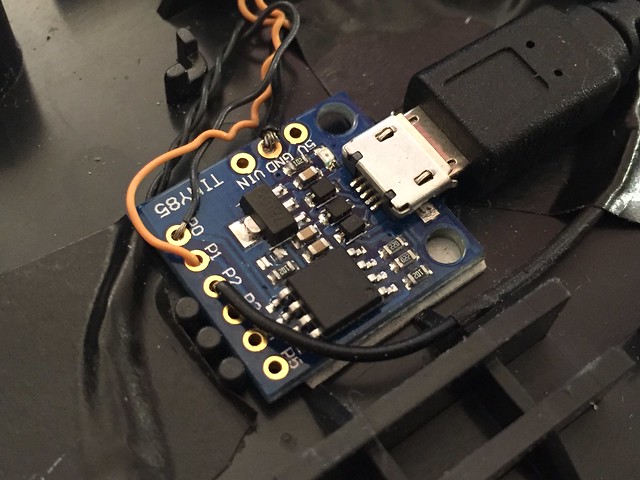
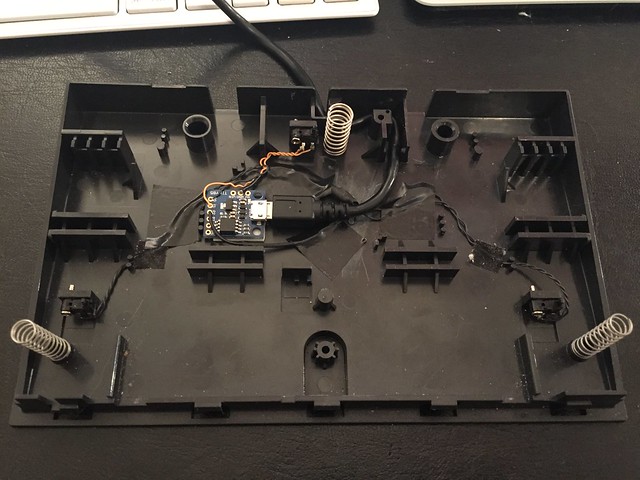
You can probably just about make out my wiring – the switches are between ground and P0, P1 and P2. This, combined with the software below, allows me to map a function within F4 (the application) onto each of the foot switches.
// USB Footswitch code, written for a "hacked" Olympus PS26 footswitch and a Digispark, but should work with a variety of 3-button footswitches
// and any ATTINY85 using the digispark bootloader.
// Code written by @dbpharrison,  21/03/2015
// More information at: wp.me/p2ymbM-aA


#include "DigiKeyboard.h" //inc

// here we define which keystroke each of the switches sends - these will differ depending on your transcription software
//I have the left switch set to rewind, the middle switch to play/ pause and the right switch to FF. You can set this up as you please
#define left_key KEY_F3
#define mid_key KEY_F5
#define right_key KEY_F6

void setup() {

    pinMode(0, INPUT); //pin 0 is left button
    pinMode(1, INPUT); //pin 2 is middle button
    pinMode(2, INPUT); //pin 3 is right button

    //INPUT_PULLUP doesn't exist on the digispark, so make switch pins high here...
    digitalWrite(0, HIGH);
    digitalWrite(1, HIGH);
    digitalWrite(2, HIGH);
}


void loop() {
    DigiKeyboard.sendKeyStroke(0);  //this is here to make sure that no keypresses are missed... I've personally found no difference with including it or not.


    // reads each of the pins to make the rest of the code a little easier
    int left = digitalRead(0);
    int mid = digitalRead(1);
    int right = digitalRead(2);


    // If the button is pressed...
    // There is a 1second delay after the first keypress, then if the button is held down keypresses are repeated after 100ms,
    // this makes scrubbing forwards or backwards quicker (and doesn't necessitate "dancing" on the footswitch
    if (left == LOW) {
      DigiKeyboard.sendKeyStroke( left_key );     //send keystroke
      DigiKeyboard.delay(1000);                   //delay for one second
      left = digitalRead(0);                      //reread the
      while (left == LOW) {                       //stay in this loop until the switch is released
        DigiKeyboard.sendKeyStroke( left_key );   //send keystroke
        DigiKeyboard.delay(100);                  //now delay for only 100ms - this means if you want to skip forwards or backwards it scrubs quicker
        left = digitalRead(0);                    //read the switch value again
       }
     }


    // Now similar code for the other switches..
    else if (mid == LOW) {
      DigiKeyboard.sendKeyStroke( mid_key );
      DigiKeyboard.delay(1000);
      mid = digitalRead(1);
      while (mid == LOW) {
         DigiKeyboard.sendKeyStroke( mid_key );
         DigiKeyboard.delay(100);
         mid = digitalRead(1);
      }
    }

    else if (right == LOW) {
      DigiKeyboard.sendKeyStroke( right_key );
      DigiKeyboard.delay(1000);
      right = digitalRead(2);
      while (right == LOW) {
         DigiKeyboard.sendKeyStroke( right_key );
         DigiKeyboard.delay(100);
         right = digitalRead(2);
      }
    }

   DigiKeyboard.delay(1); //I'm not entirely sure what this does - I might take it out!
}
Not the most beautiful code I am aware, but it gets the job done well enough!
As you can see, as soon as the arduino picks up the switch being pressed it sends the keyboard command over to the PC (using a totally standard not at all fancy HID interface), then if the user keeps the swith pressed down for 1000ms it repeatedly sends the command every 100ms. In practice, this means that if I want to skip forwards, I can press the footswitch once to skip forwards 2 seconds (as is my setup in F4), and then if I keep my foot pressed down it will skip forward another 2 seconds, every 100ms. Lifting my foot makes it play at normal speed once again. Handy.
At the moment I have the left pedal set to skip back, the middle pedal set to play/ pause (which also skips back 2 seconds each time it’s pressed) and the right pedal to skip forward. I might change this setup over time – at the moment I’m just enjoying the freedom of not being restricted to just one pedal!
Let me know if this has been useful for you 🙂
Hi Danny ,
my friend forwarded your article as she has the similar problem. I work with arduino as a hobby but mainly with the hardware, not with a programming. I have an arduino uno and uploaded your code. However, she is now asking for the DigiKeyboard.h library. I downloaded that one, then she asked for another library….and so on.
Should I just buy the same Digispark Kickstarter Attiny85 USB Development Board for arduino from ebay and your code will work?
many thanks for your help
Best regards
Daniel
Hey,
nice job, I like your radical approach :D.
To run it on Win 10 without a hardware hack, but with a software hack I solved it with the help of this:
https://github.com/tballas/Olympus-Foot-Pedal-RS-26-PyUSB-Application
maybe that helps someone else who is to lazy for soldering at the moment ;).
cheers
and afterwards just insert and define the keys for the transcribe programme of choice:
https://stackoverflow.com/a/43567521
I have an RS-28 that was donated for ewaste recycling. I hope that I can follow your tips, and those in the comments to make it useful again!